Set Up your vendor’s / source store
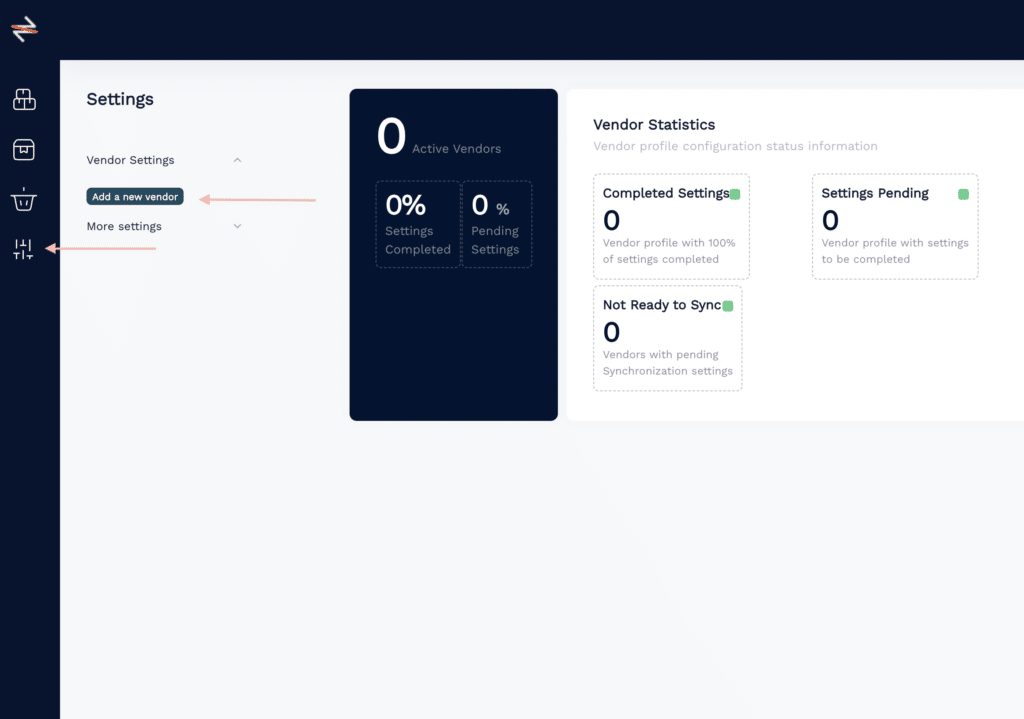
Navigate to Settings and click on the Add a new vendor button. Input the vendor’s name and select the method you’d like to use for importing their product data, which will depend on the e-commerce platform the vendor is using. You have the option to choose from Shopify, WooCommerce, or .csv import.

If the vendor is using Shopify, please click here.
If the vendor is using WooCommerce, please click here.
If you receive a .csv Url, please click here.
The general Vendor settings are for everyone the same. Here is a quick overview:
1. Vendor Info

Enter the information and ensure to hover over the ! to view a detailed explanation. Note that fields without the red asterisk* are not mandatory for the system’s functionality.
- Vendor Name in your Store: If you’ve previously established a vendor name in your Shopify or WooCommerce platform, ensure that the name matches what you enter here. Otherwise, the vendor’s products will be imported under the name you define in this section.
- Vendor Slug in your store: If you’ve previously established a vendor slug (=URL) in your Shopify or WooCommerce platform, ensure that the name matches what you enter here. Otherwise, the vendor’s products will be imported under the name you define in this section.
2. Store Info
- Vendor Currency: Please reach out to the vendor to inquire about the main currency in which their store operates.

If you find that specific currencies are missing from the dropdown list, please contact us and we will add them for you. - Vendor VAT: Please request the vendor to provide information about the main VAT type used in their store.
- VAT included: By default, the system is set up with VAT turned on unless you have been informed by your vendor that they do not use VAT in their store.
3. Synchronisation:
- Auto Sync: You can enable or disable the Auto Sync option as per your requirement. If you turn it on, the system will synchronize the stock and prices between the vendor’s source store and your destination store.
- E-Commerce Type: Select the e-commerce platform that your vendor uses.
- Vendor Store URL:
For WooCommerce, you can use the standard URL: “myecommerceurl.com”.
- If you’re using Shopify, this information will be automatically retrieved when the vendor sends you the code. See Vendor Setup Shopify for more details.
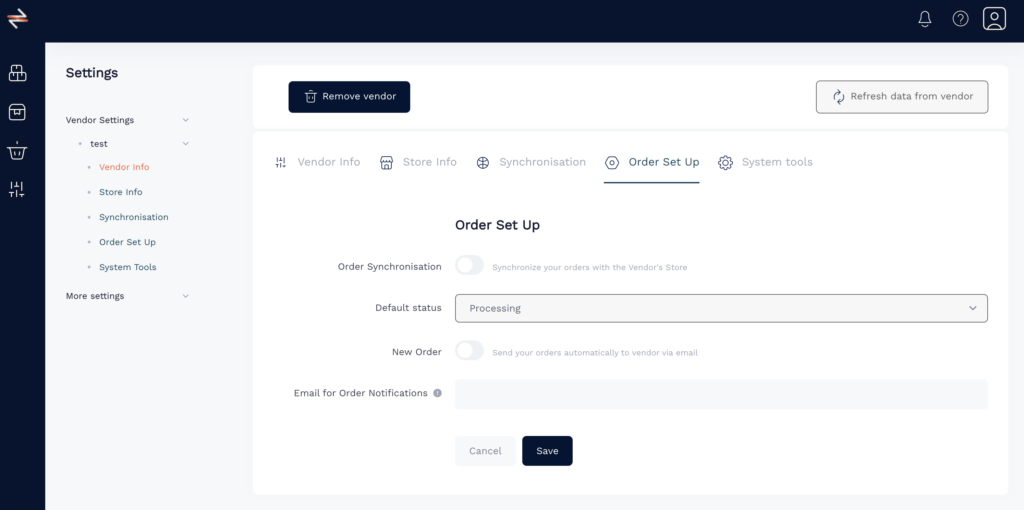
4. Order Set Up
Order Synchronisation: Select this option to automatically synchronize your orders with the Vendor’s Store.
If the vendor is using Shopify or WooCommerce, they will automatically receive your order in their e-commerce system.
If the target store uses Shopify, fulfillment is automatically handled. You can find the fulfillment information in Shopify, once the vendor has entered it.
The customer for the order will be the company that is listed under the Billing Information in Store Settings.

Default Status: The Default Status indicates the condition in which the vendor receives the order. It should be set to Processing.
New Order:
If your vendor doesn’t use Shopify or WooCommerce, you have the option to automate the process of sending orders directly to them via email.
This button is functional only for source stores not using Shopify or Woocommerce.
For Shopify and Woocommerce, the vendor’s e-commerce system automatically sends the email based on the vendor’s email settings.
5. System Tools
If your vendor operates a Shopify Store, please enter the code you’ve received from them in the designated field here.

Refresh Data from vendor:
Click this button to initiate the download/import process for all of the vendor’s products.
Once complete, you’ll be able to see these products in the Product Lists.
